Discover how to troubleshoot and repair common electronics issues with our step-by-step guide, essential tools, and DIY benefits to save money!In our increasingly tech-driven world, our devices are more essential than ever, yet they can encounter issues that leave us feeling frustrated and helpless. Introducing I Can Fix That Electronics Repair, your go-to resource for mastering DIY electronics repair. This comprehensive guide tackles common problems you might face with your devices, empowering you with the knowledge and confidence to restore functionality without always relying on professional services. From understanding typical electronics issues to a detailed step-by-step guide, we’ll equip you with the essential tools and tips needed for your repair projects. Not only will you learn how to save money through DIY fixes, but you’ll also know when it’s best to call in the pros. Join us as we delve into the world of electronics repair and unlock the skills you need to keep your gadgets running smoothly.
Understanding Common Electronics Issues You Can Fix
Many people often face issues with their electronic devices, but before deciding to replace or dispose of them, it’s essential to know that there are common problems you can resolve on your own. Here are some typical electronics issues that you can fix:
- Power Issues: If your device doesn’t turn on, check the power source, replace batteries, or examine power cables for any damage.
- Screen Problems: Issues like flickering screens or no display can often be resolved by adjusting connections, replacing displays, or resetting the device.
- Overheating: If your electronics are overheating, it may be due to dust accumulation or a blocked vent. Cleaning the device can often solve the issue.
- Squeaky or Sticky Buttons: Dirt and grime can cause buttons to become unresponsive. Cleaning or replacing buttons can restore functionality.
- Audio Problems: Poor sound quality or no sound at all can sometimes be fixed by checking audio settings, ensuring connections are secure, or replacing speakers.
- Wireless Connectivity Issues: If your device isn’t connecting to Wi-Fi or Bluetooth, restarting the device or resetting the network settings often helps.
Being able to identify these common issues means that I can tackle a range of problems that arise without needing to visit a repair shop. This not only saves time but can also lead to significant cost savings.
Step-By-Step Guide: How I Can Repair Electronics
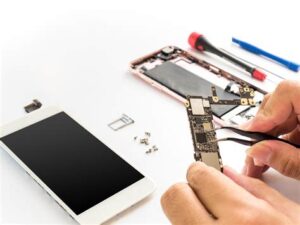
Repairing electronics can seem daunting, but with the right approach, you can successfully tackle common issues. Here’s a step-by-step guide on how I can repair electronics effectively.
- Identify the Problem: Start by determining the specific issue with your electronic device. Is it not turning on, or is there a visible physical damage? Make notes of any unusual behavior.
- Gather Necessary Tools: Before diving into the repair, ensure you have all the essential tools at hand. This includes screwdrivers, a soldering iron, a multimeter, and replacement parts, if needed. Remember, having the right tools is crucial for success.
- Disassemble the Device: Carefully open the device using appropriate tools. Keep track of all screws and components, as they can be small and easy to misplace. Document your disassembly process with photos, which can help during reassembly.
- Inspect Internal Components: Once inside, check each component for signs of damage. Look for burnt parts, loose connections, or anything unusual. Use a multimeter to test components as needed.
- Make Necessary Repairs: Depending on the issue, you may need to replace parts, resolder connections, or clean components. Follow safety precautions and ensure the device is unplugged while working on it.
- Reassemble the Device: Carefully put everything back together in the reverse order of disassembly. Ensure that all components are securely attached and that screws are tightened correctly.
- Test the Device: Plug the device back in and perform a test to ensure it works correctly. This is the moment of truth, and it’s incredibly rewarding if all goes well!
- Troubleshoot if Necessary: If the device does not work as expected, revisit the steps to troubleshoot. Double-check connections and components. Sometimes the issue requires further investigation.
- Documentation: Once fixed, document your repair process. This can help you for future repairs and might assist others facing the same issues. Share your experience and tips online to inspire DIY enthusiasts.
- Share Your Success: Finally, celebrate your achievement! Whether it’s telling friends, sharing on social media, or writing a blog post, sharing your experience encourages others to engage in DIY electronics repair.
By following these steps, I can not only feel confident in tackling electronic repairs but also empower others to do the same. This hands-on approach saves money and promotes a sustainable lifestyle by reducing electronic waste.
Tools You Need for ‘I Can Fix That’ Projects
When embarking on your journey of electronics repair with the motto I can fix it, having the right tools at your disposal is essential. Below are some of the key tools and equipment that will help you tackle various repair projects effectively:
- Screwdriver Set: A comprehensive screwdriver set with various sizes and types, including Phillips, flathead, and Torx, is crucial for opening devices without damaging them.
- Multimeter: This versatile tool allows you to measure voltage, current, and resistance, helping you diagnose electrical issues accurately.
- Soldering Iron: A quality soldering iron is necessary for making precise electronic connections or repairing circuit boards.
- Solder and Flux: Along with your soldering iron, you’ll need solder wire to join components and flux to improve the electrical connection.
- Wire Strippers: These are essential for safely removing insulation from wires, ensuring proper connections during repairs.
- Heat Gun: A heat gun can be used for removing adhesive components and heat-shrinking tubing securely around joints.
- ESD Tools: Electrostatic discharge (ESD) tools, such as wrist straps and mats, help protect sensitive electronic components from damage during repairs.
- Tool Organizer: To keep your tools organized and easily accessible, invest in a tool organizer or toolbox.
- Magnifying Glass or Microscope: This is particularly helpful for inspecting tiny components and ensuring precise repairs.
- Digital Camera or Smartphone: Use these devices to document your repairs, which can aid in troubleshooting or reassembly later on.
By gathering these essential tools, you will be well-prepared for most electronics repair projects under the I can fix that banner. Each tool plays a unique role in ensuring your repair process is efficient and successful.
Benefits of DIY Electronics Repair: I Can Save Money
Embarking on a DIY electronics repair journey often comes with a multitude of advantages, and one of the most significant benefits is the potential to save money. Here are some key points that highlight how I can save money through DIY repairs:
- I can avoid labor costs:
- I can utilize low-cost parts:
- I can prevent future damages:
- I can benefit from resale value:
- I can enhance my skills:
Hiring a professional repair technician can be expensive. By tackling the repairs myself, I can eliminate these costs entirely, resulting in substantial savings.
When I take on repairs myself, I can often source parts from budget-friendly suppliers or even salvage them from old electronics, further reducing expenses.
By learning how to fix my devices, I can gain insights into proper maintenance. This way, I’m less likely to face costly repairs in the future.
If I repair electronic devices instead of discarding them, I can often sell them for a much higher price than if they were non-functional.
Every repair I successfully complete enhances my technical skills, enabling me to take on increasingly complex projects without the need to hire help.
In conclusion, engaging in DIY electronics repair not only provides invaluable knowledge and experience but also helps I can significantly reduce costs, making it a worthwhile endeavor for anyone looking to save money while navigating their electronic issues effectively.
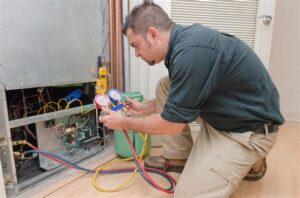
When to Seek Professional Help: I Can Only Do So Much
Even the most dedicated DIY enthusiasts must recognize their limits. While I can tackle minor repairs and maintenance tasks with confidence, there are specific situations where seeking professional help is the smartest choice. Here are some indicators that it might be time to call in the experts:
- I can only diagnose the issue but can’t fix it: If you’ve identified a problem but lack the skills or tools to repair it, consider reaching out to a professional.
- Safety concerns: If the repair involves high voltage, delicate components, or hazardous materials, it’s best not to take unnecessary risks. Professionals have the training to handle these situations safely.
- Warranty implications: If your device is still under warranty, attempting to repair it yourself could void that warranty. In such cases, it’s prudent to consult with a certified technician.
- Repeated failures: If you’ve attempted to fix the issue multiple times without success, it may indicate a more complex problem that requires expert intervention.
- Time constraints: Not everyone has the time to troubleshoot and repair electronics. If your time is limited, hiring a professional can save you both time and frustration.
By acknowledging these signs, you can enjoy the rewarding experience of DIY electronics repair while knowing when it’s time to let the professionals handle what I can only try to fix. Remember that seeking assistance does not equal failure; it can often be the most efficient way to ensure your gadgets are up and running optimally.
Frequently Asked Questions
What types of electronics can be repaired?
Most common electronics such as smartphones, tablets, laptops, and game consoles can be repaired, along with smaller appliances and gadgets.
What are some common signs that an electronic device needs repair?
Common signs include the device not turning on, strange noises, overheating, broken screens, and unresponsive buttons.
Should I attempt to repair my electronics myself?
If you have the skills and tools, you can attempt a DIY repair. However, for complicated issues or valuable devices, it’s often best to consult a professional.
What tools do I need for basic electronics repair?
Basic tools include screwdrivers, pliers, a multimeter, and suction cups or plastic spudgers for opening devices.
How can I find reliable repair services for my electronics?
Look for repair shops with good reviews online, ask for recommendations from friends, and check if they provide warranties for their services.
What is the average cost of electronics repair?
The cost varies based on the device and the issue, ranging from as low as $50 for simple repairs to several hundred dollars for extensive damage.
Are there any precautions to take when repairing electronics?
Yes, always unplug the device, discharge any capacitors, and work in a static-free environment to avoid damaging components.