Explore solutions for Windows 11’s automatic repair loop, covering causes, advanced startup options, and prevention techniques for a smoother computing experience.Are you frustrated with the persistent automatic repair loop in Windows 11? You’re not alone. Many users encounter this issue, which can disrupt productivity and leave you in a state of uncertainty. In this comprehensive guide, we’ll help you understand the automatic repair loop, explore its common causes, and equip you with the tools to escape this troublesome cycle. By accessing advanced startup options and following our step-by-step instructions, you can effectively resolve this issue and restore your system’s functionality. Additionally, we’ll share valuable tips to prevent future occurrences, ensuring a smoother computing experience. Dive in to regain control of your Windows 11 device!
Understanding The Automatic Repair Loop In Windows 11
The Automatic Repair loop is a common issue faced by Windows 11 users. This problem typically arises when the operating system fails to start properly, leading to a continuous cycle of attempts to diagnose and repair itself. Windows usually triggers this process automatically, aiming to resolve startup failures but can instead leave users stuck in frustration.
When Windows 11 encounters significant errors during the boot-up sequence, it enters this repair mode to identify and fix issues. However, if the underlying cause is not resolved, it can get caught in a loop, preventing access to the desktop and necessary functionalities.
Here are several key points to understand about the automatic repair loop:
| Aspect | Description |
|---|---|
| Error Messages | Users may encounter messages like “Your PC did not start correctly” or “Preparing Automatic Repair.” |
| Diagnosis Tools | The system attempts to use built-in diagnostic tools to resolve performance issues. |
| Impact on Users | Users often experience delays in accessing their systems, which can affect productivity. |
| Resolution Methods | Various techniques can be employed to exit the repair loop, which will be discussed in the guide. |
Understanding this loop is the first step in knowing how to effectively address it. Each computer may behave differently based on specific hardware and installation configurations, so identifying particular symptoms can aid in finding the right solution.
Common Causes Of The Automatic Repair Loop
The automatic repair loop in Windows 11 can be a frustrating issue that hinders your computer’s functionality. Understanding the common causes of this problem is essential to effectively troubleshoot and resolve it. Here are some of the key reasons why you may encounter the automatic repair loop:
- Corrupted System Files: Files essential for Windows to boot correctly may become corrupt due to various reasons, such as improper shutdowns or malware infections.
- Faulty Updates: Sometimes, a recently installed Windows update can cause incompatibilities or errors, leading to the automatic repair loop.
- Incorrect BIOS Settings: Misconfigured BIOS settings can prevent your system from booting properly. Ensuring that the boot order prioritizes your hard drive is essential.
- Hardware Issues: Failing hardware components, such as faulty RAM or a defective hard drive, may trigger boot problems and contribute to the automatic repair loop.
- Improper Shutdowns: Frequent abrupt shutdowns or power outages can damage system files and lead to boot errors.
- Third-Party Software Conflicts: Certain applications, particularly system utilities or security software, can interfere with Windows startup procedures.
Addressing these underlying issues is crucial for successful troubleshooting. By identifying the root cause, you can apply the appropriate fixes and minimize the risk of experiencing the repair loop in the future.
How To Access Advanced Startup Options Easily
Accessing the Advanced Startup Options in Windows 11 is a crucial step when you’re dealing with the automatic repair loop. Here are a few methods you can use to easily navigate to these options:
Once you are in the Advanced Startup Options, you can choose various recovery tools and troubleshoot the issues contributing to the automatic repair loop. Knowing how to access these options easily will save you time and frustration in resolving problems with your Windows 11 system.
Step-By-Step Guide To Fixing The Repair Loop
If you’re facing the automatic repair loop in Windows 11, follow these steps to resolve the issue effectively:
- Access Advanced Startup Options: First, boot your computer and interrupt the startup process three times. This will lead you to the recovery environment.
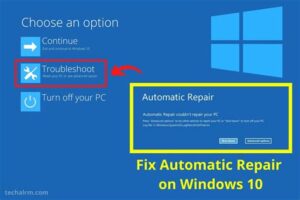
- Select Troubleshoot: In the recovery menu, click on “Troubleshoot” to access recovery options.
- Choose Advanced Options: From the Troubleshoot menu, select “Advanced options” to proceed with further troubleshooting.
- Use Startup Repair: Click on “Startup Repair.” Windows will attempt to fix any issues preventing it from starting properly.
- Boot into Safe Mode: If Startup Repair doesn’t work, return to the Advanced options and choose “Startup Settings,” then click “Restart.” When your PC restarts, press the corresponding key (usually F4 or F5) to boot into Safe Mode.
- Perform a System Restore: In Safe Mode, you can perform a system restore by typing “System Restore” into the search bar and following the prompts to revert your system to a previous state.
-
Check and Repair Disk Issues: Open Command Prompt from Advanced options and type the following commands:
chkdsk /f /r C:
This command will check for any disk errors and try to fix them.
-
Repair the Boot Configuration Data: While still in Command Prompt, type the following commands to fix the Boot Configuration Data (BCD):
bootrec /fixmbr
bootrec /fixboot
bootrec /scanos
bootrec /rebuildbcd
- Reset Your PC: If all else fails, you can reset your PC by selecting “Reset this PC” from the Troubleshoot menu. Choose the option to keep your files or remove everything, depending on your situation.
Following these steps on how to fix the automatic repair loop should help you get your Windows 11 system back to normal. If you’re still facing difficulties, consider seeking further assistance from a professional.
Preventing Future Occurrences Of The Repair Loop
To enhance the stability of your Windows 11 system and prevent the automatic repair loop from recurring, consider implementing the following strategies:
- Regularly Update Windows: Ensure your Windows 11 operating system is up to date. Microsoft frequently releases updates that can patch vulnerabilities and fix bugs that may lead to system errors.
- Check Hardware Health: Periodically check the health of your hard drive and other hardware components. Use tools like Windows CHKDSK or third-party software to identify and rectify any underlying hardware issues.
- Limit Unnecessary Software: Avoid installing unnecessary third-party software that may conflict with system processes. Stick to trusted applications from reputable developers.
- Use a Reliable Antivirus: Install reliable antivirus software and perform regular scans for malware. Certain types of malware can cause substantial system instability.
- Regularly Create Backups: Regularly back up your important files using Windows Backup or other backup solutions. In the event of a failure, having secure backups can save you significant time and trouble.
- Check for Driver Issues: Ensure all your device drivers are updated and compatible with Windows 11. Use the Device Manager to identify and rectify any issues with drivers.
- Manage Startup Programs: Limit the number of programs that start with your computer. This can reduce boot time and decrease the likelihood of conflicts that lead to repair loops.
By following these proactive measures, you can significantly reduce the chances of encountering the automatic repair loop in Windows 11, ensuring a smoother and more reliable computing experience.
Frequently Asked Questions
What is an automatic repair loop in Windows 11?
An automatic repair loop occurs when Windows 11 fails to start properly and repeatedly attempts to diagnose and fix the startup issue, but is unable to resolve it.
What are common causes of the automatic repair loop in Windows 11?
Common causes include corrupted system files, improper shutdowns, faulty drivers, system updates, and issues with the hard drive.
How can I access the Advanced Startup Options to fix the loop?
To access Advanced Startup Options, restart your computer and during the boot process, hold the power button to force shutdown. Repeat this twice, and on the third startup, Windows will enter Recovery Mode. From there, select ‘Troubleshoot’ and then ‘Advanced options’.
What is the System File Checker and how do I use it?
The System File Checker (SFC) scans for and repairs corrupted system files. To use it, access Command Prompt in Advanced Startup Options and type ‘sfc /scannow’, then press Enter.
Can I fix the automatic repair loop without losing my data?
Yes, there are several troubleshooting methods, like using System Restore or Command Prompt, that can resolve the issue without affecting your data. However, using Reset This PC may result in data loss if not done carefully.
What should I do if the automatic repair loop persists after trying fixes?
If the loop persists, consider backing up your important files using recovery tools and perform a clean installation of Windows 11 to start fresh.
Is it possible to prevent the automatic repair loop from happening?
To reduce the risk of encountering an automatic repair loop, regularly update your system, maintain backups, avoid abrupt shutdowns, and ensure your hardware is functioning correctly.